georgia-market.com moderated newsgroup and market bazzar > Dublin
> Industrial
> Make a radial 6 cylinder steam engine with lathe & mill
Make a radial 6 cylinder steam engine with lathe & mill
bounce, yer money order will get lost in the mail and yer dog won't come home.
click on our "Contact Us" icon above for the quickest response to your questions.
MAKE A RADIAL 6 CYLINDER STEAM ENGINE WITH LATHE & MILL
MAKE A RADIAL 6 CYLINDER STEAM ENGINE WITH LATHE & MILL
MAKE A RADIAL 6 CYLINDER STEAM ENGINE WITH LATHE & MILL
MAKE A RADIAL 6 CYLINDER STEAM ENGINE WITH LATHE & MILL
MAKE A RADIAL 6 CYLINDER STEAM ENGINE WITH LATHE & MILL
MAKE A RADIAL 6 CYLINDER STEAM ENGINE WITH LATHE & MILL
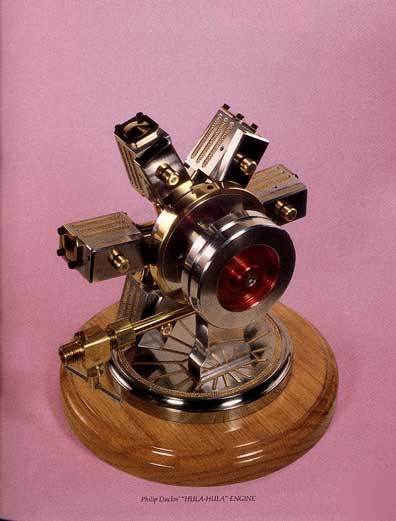
This Featured Section of the larger second volume of steam & stirling models project book covers building a Hula Hula 6 cylinder steam engine. It includes drawings, instructions and commentary on the building methods. The book includes 29 model projects in all and yes, you get the whole book! Whatever is needed in the way of drawings, instruction and comments on methods to successfully complete each project is included.
This is just one of the 29 projects included in the book. I'll let each author tell you a little about their project in their own words. Here's Phil.
Approximately 75 years ago, model builders were constructing relatively lightweight single-action, six-cylinder radial steam engines, along with flash boilers. Okay! So what did they do with them? They were used as motive power for model airplanes! It must have been quite a sight to see one of them fly!
Our little motor certainly was not designed to power a model plane. Actually, it is more of a "showpiece" or "display" model. But its most unique quality comes from the fact that it is an oscillating, dual-action six-cylinder radial engine!
When this 1/2" bore motor is in action, the motion of the moving parts is very reminiscent of a fast wiggling hula-hula dancer - or better yet, six of them!
The speed control is a common brass 1/8" pipe needle valve, and thus the engine can be adjusted from a slow "wiggle" of about 40 rpm to a blurry fast wiggle of perhaps 2,000 rpm. the motor runs as well without a flywheel as with one!
An interest in live steam power affects us in a variety of ways. Some of us are keen on traction engines, some on steamboats, some on stationary engines and some on locomotives.
I often remember how difficult it was for me to get started in my hobby, and I wonder if others, particularly young people, experience the same difficulties I had, and whether they would appreciate some instruction to help them get started.
For a number of reasons I thought of scheming out a group of small beginners engines that would serve as exercises, give practice in working in a small machine shop, and instruction in some techniques not so well understood, ending up with a little piece of machinery that looks right, works well, and gives the builder some satisfaction.
I thought of including a little theory, making use of a pocket calculator, and stressing a few methods I have found by experience to yield very accurate results and from which I get a lot of pleasure. I took into account what I considered to be extremely high costs, and tried to show how to build everything from scrap or surplus materials to save that precious commodity, money, for better tools.
This engine is a single-cylinder vertical, and it would do very well as a power plant for a small boat. It is single acting, which means steam pressure pushes the piston down, but that energy stored in the flywheel during the "down" stroke is used to push the piston back up again, thereby pushing out the exhaust steam. There is one major disadvantage in a boat, however; it cannot be reversed.
I have tried to make this little engine look like a proper marine engine. All parts are made from appropriate materials, the cylinder being iron, but fabricated and so not requiring a casting. It is all held together with correctly proportioned hex head screws which you will make yourself. You will require a small lathe and either a vertical milling machine or a vertical slide attachment for the lathe. You will also need an assortment of drills, taps, dies, milling cutters and reamers. However, not wanting to overwhelm the prospective builder with high costs, I have tried to keep these to a minimum, and a list of small tools is included.
Usually the one- or two-cylinder oscillating steam engine is built in a rather squat form. We all know the compactly built marine engines often constructed as two-cylinder V-engines and, in my opinion, the ultimate, the four-cylinder engine as described lately by Jan Gunnarsson. Of course, these thoughts are not related to scale models of this type of engine, as used on paddle steamers, etc.
In designing Simplex, I have departed from this practice, as it was my aim to build an attractive stationary engine taking full advantage of the simplicity of the oscillating cylinder. I will describe the construction of the basic one-cylinder (Simplex) version, but it is just as easy to build the two-cylinder engine (Duplex), making it more powerful and self-starting if the two cranks are squared.
Duplex is capable of driving a small dynamo with 30 psi pressure. To make it run at moderate speed, a long stroke double-acting cylinder and a big flywheel are provided. Once the engine is ready, you can adorn it with steps, hand rails and paintwork to your own liking.
I found great pleasure in building Rob van Dort's Duplex at 50% larger size and with a reversing feature. I used a system like Jan Gunnarsson's on his "V4 Oscillating Steam Engine". It is a simple reversing valve distribution block and piping.
The valve block is 1" diameter ¼" thick brass, laid out with four holes on a 5/8" hole circle, and drilled 1/8" diameter, 1/8" deep.
Brasso is a decorative, working replica of a beam engine. There were no preliminary drawings. It was made up as I went along, following recollections of an old model once seen in a London shop.
The size was dictated by odds and ends of brass from my scrap box. The sketch included here was made after completion. Working without drawings is a recreation for me - I can do what I please. But to do this, parts must be built in a logical sequence.
Brasso is about a 30-hour project. If you would like to go at it, but have no scrap box, I've included a bill of materials. I've tried to indicate the minimum lengths needed, but why not get a foot of every size? Then you, too, will have a scrap box. The power tools used were a 6" Atlas lathe with milling attachment, drill press, belt sander, and polishing wheel.
Brasso has been run so far only on air. Slowest smooth speed is about 100 rpm at 15 psi. This is a bit fast. A slower speed could be achieved with a larger flywheel, and this would be more faithful.
This little engine has instantly appealed to all who have seen it on my desk. Why is this? First, I think, is the use of polished brass - this says it is a decorative replica, not an authentic scale duplicate. In short, the model is a sort of unpretentious cartoon.
Second, the free architectural turnings seem to speak of an earlier time; aside from a few clues, the thing could be passed off as being 200 years old. Third, the overall proportions seem right. The yoke-tenons are a bit grotesque, but even this adds to the appeal. If too perfect, a model becomes like a watch - beyond the ken of most viewers.
Finally, a comment on designing and building out of your mind's eye rather than drawings: This is not exactly a beginner's sport, but if you have been a good observer over the years, it is a most enjoyable and challenging thing to do.
It wasn't until some months ago that I learned of the existence of the speeder hobby, but I'm sure you young Live Steam enthusiasts, and future machinists and engineers to whom I'm addressing this article, are far more knowledgeable on this subject than I. As far as I can find out, no one seems to know where the name "speeder" originated. It certainly doesn't fit a machine that travels this slow, nor should it be expected to.
All things considered, I doubt I'll ever be the proud owner of a standard track steam speeder. However, why not a model that can operate on 4-3/4" gauge club tracks (or on a floor or outside on a flat surface minus the wheel flanges)? Here's one you can build using only a power drill, soldering torch, and the usual hand tools.
The trick is to build the machine without having to construct the engine, boiler, wheels, or gears. These items, which are Mamod and Wilesco parts, can be obtained commercially from Frank Van Meeuwen at Diamond Enterprises. Their ads can be seen frequently in Live Steam. Frank told me he has all components in stock, or can order them for you, and will give Live Steam readers a 20% discount by mentioning where they saw the ad.
Other than this, everything you need can be scrounged up or obtained in your local hobby shop and/or hardware store. All the nuts and bolts are the same size (6-32 x 1/2"), and the model can be assembled or disassembled in ten or fifteen minutes.
Once you have all the components, it shouldn't take more than three or four weekends to complete your engine.
A twin-column, twin-cylinder, self-starting mill engine
My "NDC-1" was inspired by an engine I saw in the Science Museum in London, England, in January of '92. The museum model was quite large (approximately two feet tall), and was attributed to John Musgrave, 1843.
The staff at the museum was very helpful but could not locate any drawings of the engine. Their photo library was, however, able to provide an 8-1/2 x 11" glossy print of the engine. Since I was leaving for home the next day, I settled for the photo intending to "maybe later" scale it.
Sometime later, a friend gave me a copy of an article on Non-Dead-Center engines written by Sam Clogston. After a phone call to Mr. Clogston, the "maybe later" idea quickly moved to the drawing board to become the NDC-1. It has no dead centers (self-starting).
With some alterations, the overall height of the engine can be drastically reduced, thus allowing for marine use ... maybe later. This particular design was used primarily in the textile industry and was manufactured in various sizes from 10 to 200 hp.
One of the amazing features of this very intriguing engine is that its energy source is merely a clean burning denatured alcohol flame positioned near the cylinder porthole.
This is not a Stirling cycle motor; it's usually referred to as a "flame sucker." An even more accurate title would be "atmospheric" or "vacuum" engine. This little mechanism is not powerful, yet when properly adjusted it will attain speeds up to 1,100 rpm.
Even though it emits a smart, crackling "pop" like a gasoline motor, the similarity ends there. For instance, the power stroke of this engine occurs when the ringless piston moves toward the cylinder head. As the piston approaches the end of this stroke, a fast-acting slide valve opens the cylinder porthole. When the piston begins its outward stroke, the flame is sucked into the cylinder. Near the end of this stroke, the slide valve quickly closes the porthole.
In a small fraction of a second, hot gases trapped in the cylinder begin to cool, thus creating a vacuum within the cylinder. Outside atmospheric pressure now pushes the piston inwards with enough force to keep the engine in motion until the entire cycle is repeated in the next revolution. The motor speed is controlled by the proximity and size of the flame near the porthole.
Although this is a very simple engine with a minimum amount of parts, you'll find it to be a fascinating and challenging project, well worth the effort. Our little motor has a 1" bore by a 1-3/4" stroke and is about as modern as an ancient design can get. It boasts an adjustable cam for fine tuning and a semi-balanced crank arm for optimum performance.
An Automatic Electrical Model Boiler
Weather conditions frequently prevent steaming model boilers outdoors with any degree of comfort. Also, it's difficult to tend the fire, handle the engine, and instruct a couple of active grandsons all at the same time. I decided to consider alternative methods for cleanly generating model engine quantities of live steam in the shop or even on the kitchen table.
As a heat source, an electric immersion heater seemed practical. Theory is, of course, wonderful; the big question remains would it actually work. Well, the design shown herein turned out to work perfectly! On the first test, with temporary wiring, a hose exhausted steam into a bucket.
It was gratifying to rapidly open and close the stop valve and, via the pilot light, watch the thermoswitch cycle the immersion heater to maintain whatever steam pressure you've dialed into the system.
The knob at the left end of the boiler adjusts the thermoswitch setting and thus the steam pressure. The immersion heater at the right end of the boiler extends into the electrical junction box, where all electrical connections are made and concealed.
Imagine a little engine for your bicycle, canoe, or campside generator set that is as quiet as a sewing machine. It runs on kerosene, and its nonpoisonous flue gases are practically odorless. It starts easily, and, with only seven moving parts, it should run without repair for many hundreds of hours, burning less than one-half liter of kerosene per hour.
Such an engine was developed 30 years ago and incorporated into a 200 watt generator set by the Philips Company of Holland; it is the modern stirling "hot air" engine.
Unfortunately, only about 100 of these units were made, and stirling engine research soon passed them by in the pursuit of more efficient, but less practical, helium and hydrogen engines.
Correspondence with Dr. Ted Finkelstein, one of the leading authorities on stirling engines, set me on the right track. He suggested I simplify my designs and minimize thermal conduction losses.
Pursuant to Ted's advice, I redesigned the top portion of the 65 cc rhombic and, at last, it ran. On its first run it turned only 200 rpm, but it was quiet, and I was elated.
I then made, over a long period of time, a series of improved propane burners. This burner work paid off.
The 65 cc rhombic became one of my best engines. It has been the basis of many tests on alternate coolers, heaters, and regenerators; and through it all has run many hours on minimal lubrication without giving any trouble.
Still in quest of simplification, an 11 cc two-piston (Rider type) engine similar to the 11 cc rhombic, was built. This engine turned out to be very fast (3600 rpm) and very easy to make.
For any of you younger readers (or the "kids at heart") who might like to build a model of the old roller, let me tell you how I constructed mine.
As far as materials are concerned, they all came from the junk box. And the only power tool I used was a hand drill with a broken trigger. Give it a try!
The Body/Chassis is constructed of wood and aluminum - mostly wood - with a band of light iron around the bottom to hold everything together. The curved part in the front is carved from wood with the exception of the rectangular box attached to it. If you can get your hands on a band saw, you could zip this part out in no time. My box is hollow, and contains clock gears for steering.
So, to recap - the light iron band was from the junk box, the aluminum from a window frame, and the wood from a tree.
The Boiler you see in the photos is just an outer shell. The "working" boiler is inside. The shell is made from an insect spray can. The real boiler is a section of 2" brass tube from the junk box. The ends were sealed with scrap sheet brass with a 3/8" brass flue tube in the center.
All soldering was done on the kitchen stove. The stack is just a bit of brass pipe from an old lamp. It was slipped over the boiler flue tube. The decorative brass ring on top was left on from the same piece of pipe. I just thought it added a nice touch.
Water for the boiler enters through an automobile tire valve, with the cap jazzed up by using a little brass tubing. I made a little working door at the bottom of the boiler to light the burner, but a hole there would work just as well.
The steam line is 1/8" copper tubing, and runs from the top of the boiler down inside the shell and up through the floor next to the engine.
The Burner - a short cut was taken here; I should have installed an alcohol tank in the rear and run tubing to the boiler, but I was in a hurry to see the of girl rolling. The burner is just the cap from the bug juice spray can bolted to a hinge and screwed to the undercarriage. About fifteen minutes work was all it required.
The hinge is necessary so the cap can swing down to be filled with Sterno jelly. The Sterno works well, and will keep the machine running for almost half an hour. I suspect the long run is partly due to the low gearing which puts very little strain on the engine.
Plus 18 more building projects! That should keep you off the streets for a good while! Most of the materials for these projects you'll find in your scrap box or in your pal's scrap box. Get together with him (Her? keep dreamin!) to build some projects. It's always more fun working together.
The projects presented have been built by men from all walks of life and were designed and written by 22 different hobbyists from an equally broad span of devotees who enjoy model engineering as a fascinating and extremely satisfying hobby.
If you don't presently have a home workshop, you can start off with the simplest projects which can be built with the inexpensive hand tools found in almost any home or apartment.
The level of difficulty ranges from the very simple engines of John Aho, Andy Sprague, and Ray Colin, whose projects can be completed with little more than a drill press and hand tools, to the very sophisticated designs of Philip Duclos, Richard Mitchell, and Jeff Maier.
Many Live Steam projects have been built using a small electric hand drill as a lathe. Even if space precludes a separate room for a workshop, small-capacity metalworking machinery is available that can be set up on a kitchen table and stored away in a closet or cabinet when not in use.
Steam and Stirling - Engines You Can Build Volume 2 provides direction for the experienced and instruction for the novice in the fast-growing ranks of Amateur Machinists.
If you want to include some of the larger projects, consider enrolling in a night-school class where adequate facilities are available.
The two main requirements necessary to get you into the Live Steam Hobby are (1) decide and (2) get this book!
8-1/2" X 11" Hard cover w/dust jacket 221 pages profusely illustrated with color and b/w photos and dimensioned drawings.
Visit my MarketplaceAdvisor Gallery! Power Tools for Power Sellers!
Phone: (***) 744-4449 M-F 9:00 to 4:00 Pacific Standard Time
This item has been seen by alt people!