georgia-market.com moderated newsgroup and market bazzar > Augusta
> Electronics
> Build this steam / air engine
Build this steam / air engine
bounce, yer money order will get lost in the mail and yer dog won't come home.
click on our "Contact Us" icon above for the quickest response to your questions.
BUILD THIS STEAM / AIR ENGINE
BUILD THIS STEAM / AIR ENGINE
BUILD THIS STEAM / AIR ENGINE
If you're a model engineer or a machinist then The Home Shop Machinist is familiar to you. If not it should be. The Home Shop Machinist is a spinoff of Live Steam, the authority on machining and the like.
This Featured Project from "Projects Seven" is just one of the articles you'll get with the book from the magazine "The Home Shop Machinist ". "The Home Shop Machinist" was launched in 1982 and was met with immediate success.
Most home shop machinists do jobs that are unique to the equipment they have available. The oscillating steam engine shown in the photos is simple, yet challenging to machine using basic machinist tools. The Bill of Materials has been developed to take advantage of standard manufactured stock. However, modifications can easily be made depending on the availability of materials. If suggested material sizes are not available, more machining will be required, which may be the case for most home shop machinists. The following instructions will provide the necessary direction, yet allow for your own creative methods to surface in machining the steam engine to the required tolerances.
The steam engine can be machined by the most inexperienced machinist, and provide a challenge to the most experienced one. Boiler designs can be adapted to this plan quite easily and provide challenging fabrication techniques. The engine design permits steam or compressed air to be used as a fuel source. This particular model steam engine has run for up to three hours using Sterno as a heat source to create the steam in the boiler. All parts presented in these plans are machined except the bolt, spring and nut. These may be bought at the local hardware store or can be machined for fun, except for the spring.
You're going to find entirely new articles published nowhere else but The Home Shop Machinist. You haven't seen the projects, but you probably know the names. Harold Mason, Philip Duclos, Robert Hedin, Guy Lautard, Bill Davidson, Bob Washburn, Ed Dubosky, Dick Torgerson, Steve Acker, and Deene Johnson just to name a few.
Here each author introduces their helpful and fun projects.
The home shop machinist can build tools, jigs, fixtures, models, engines, and myriad other items using basic machine tools, hard earned skill, and a liberal dose of imagination. Fine quality work is often the result. One thing sometimes missing, however, is a really professional finish for steel parts.
Easy-to-apply finishes, such as paint and cold bluing solutions, work cosmetic wonders but have limitations. Paint can flake off, add to the dimensions of a part, run or vary in thickness, and be time-consuming to apply. Cold blue looks good on small parts but tends to streak, lacks durability, and does not always give the best luster to a polished part.
Hot salt bluing is a derivative of commercial black oxide metal coating technology. It is widely used in the firearms and gunsmithing trade. It works beautifully on most machined mild steels. It is meant for low alloy steel and will not work for stainless steels, high alloy steels, cast iron, aluminum, brass, or other non ferrous metals. Small amounts of copper will actually kill the bluing solution. You may find that bluing hardened steels will give inconsistent results.
Building Phil Duclos' Model Maker's
Shortly after receiving my copy of Phil's book, The Shop Wisdom of.Philip Duclos, I made up my mind to build the rascal. It was just what I'd been looking for. I have one of the smaller mill/drill machines Enco sells, as dictated by headroom (6'8") and weight limitations in my shop (wood floor and framing). When I shopped for a dividing head, I soon found what was on the market was too big and heavy. And it cost too much for what I could do with it. So build your own, Collins!
After studying Phil's plans I decided on some changes; I'm one of those birds who can't leave a good design alone, plus I had a few good reasons in mind.
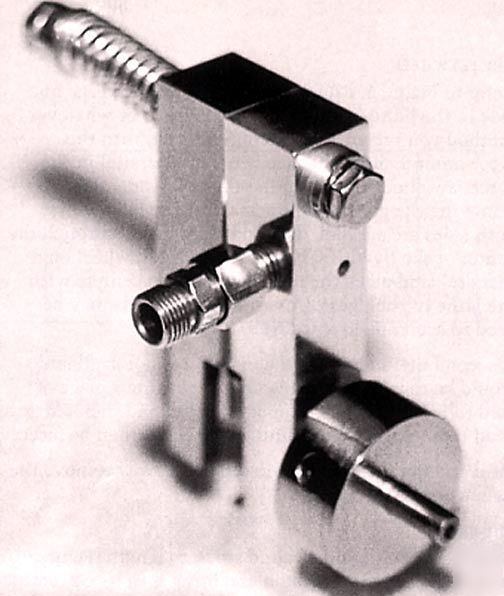
I built my little shop butt welder some years ago. The original purpose for this welder was to butt weld stainless steel tubes to the hot cap of an experimental hot air engine. This it did very well. With a little modification, the welder subsequently proved suitable for welding of band saw blades, extensions to drills up to 3/8" diameter, and clevis ends to rods for various locomotive valve gear.
The clamp arrangement.The construction of the welder was quite straightforward: A 1 kilowatt transformer with its 115 VAC primary coil wound with No. 10 wire was modified by stripping off the secondary winding and replacing it with two turns of heavy welding cable with its rubber insulation stripped off. The core was large enough to accept two cables in parallel.
The heat control is a simple triac phase controller built to plans from a General Electric SCR Manual. It works well and has never given any trouble after I figured out the appropriate rating. Until that time, I burned out three triacs! They were a little expensive at that time.
Some months ago I started a project that required a die filer, and because I didn't have one I decided to see what I could make. I reviewed a number of designs I had, but none seemed to click. I let the project slide.
One of the more challenging experiences for a craftsman is machining, fitting, assembling, and running a model engine. What had been an inert conglomeration of bar stock, castings, and fasteners has now been transformed into an active, operating mechanism. Most important, after the engine is completed, is the realization that you are the one who performed this complex and interesting series of tasks.
Typically, the successful completion of a builder's first engine is a major stepping stone to more complex projects and the development of a greater range of machining skills.
Of probably equal importance is the expansion on one's technical skills and knowledge in such areas as basic metallurgy, heat treatment, fits and tolerances, applied mathematics and other related topics. One also learns that parts that are "good enough" or "nearly okay" will never be really satisfactory. The self discipline learned in remaking parts that are not really right is valuable and is the hallmark of the good craftsman.
None of this can happen, however, until the first machining setup is made, the first chips are produced and the satisfaction of making a good – really good – part is experienced. Now is the time! Sharpen the tool bits and drills, lay out the measuring tools and let's go to work.
Plus some more projects involving techniques and making lathe accessories.
Clamping Tapered Material in a Vise - No Problem!
Large Radius Cylindrical Cuts on a Shaper
Turning Short Tapers on a Mill/drill
Heat-treatment Processes for Engine Components
Stuck Chucks, One-more-time, Didactic #17
The Proper Use of Diamond Dressers
Cutting Steel with a Circular Saw Blade
The How and Why of Tangential Cutting
The Rebirth of a Model C South Bend Lathe
A Quick Tumbler Gear Reversal Mechanism
A Pseudo Drawbar for the Tailstock
Cylinders and Pistons for Two-stroke Cycle Model Engines
Successful model engines are a combination of parts that are not only well machined and fitted but are also designed to achieve a particular goal. Of this assemblage of parts, the cylinder and piston are most crucial to effective engine operation and provide great possibilities for experimentation. These important components, in rapid succession, must capture the fuel-air charge, compress it, contain it as it burns, help to convert the energy being released into linear and then rotary motion, dispose of waste gases, and reject waste heat to the cooling medium. In the case of some high performance model airplane engines, this process is repeated well over 25,000 times a minute, and in one .40 cubic inch displacement engine, the power output is an astounding 7.9 hp per cubic inch. To achieve this level of performance, however, requires use of processes not generally available to those of us who build engines as a hobby.
Therefore, here we will deal with materials and processes within reach of practically all model engine builders. By making judicious material selections for various components, and choosing appropriate machining processes, we can produce cylinder and piston combinations that are quite efficient as well as durable. In the interest of simplicity, we will deal only with single-cylinder engines, but those who choose to build multi-cylinder engines will find that very similar design and construction decisions and choices must be made.
Most of what has been discussed in this column up to now has been in the nature of background information. It's about time to begin a first CNC retrofit project. The target machine for this effort is the Enco model 105-1100 mill-drill. A photograph of this machine with the retrofit installed appeared in the November/December '89 issue of this magazine. Many of the inquiries from readers indicated an interest in this class of machine tool as a CNC retrofit, so it was selected to be the first example in this "roll your own" series.
Convert Your Mill-drill to CNC
At the time of this writing, we here at Cardinal Engineering have converted 85 of these machines to CNC for various users across the US and Canada. This machine was selected because it is heavy enough and has a large enough motor to make respectable milling cuts in steel using end mills up to 3/4" diameter (although I recommend only 1/2" as a maximum). It also has an R-8 spindle taper which means standard collets and tooling made for the Bridgeport series of milling machines is readily available from hundreds of supply houses. Finally, the machine has a worm gear driven quill feed with a sturdy spring return mechanism which simplifies the application of a motor to the quill.
Many suppliers import these machines, generally from Taiwan. I was told by Enco that there are several manufacturers in Taiwan, all working from the same basic design drawings supplied by a central government engineering group. This would explain the close similarity in appearance between machines advertised by Wilke, Grizzly, J&L, Kabaco, and others. It would also tend to mean that just about any of these machines could be readily reworked to CNC.
Convert a Milling Machine to CNC
This is the first of a series of columns on converting a full sized, floor-model milling machine to CNC control. This series will be quite lengthy. In order to also keep up with other developments for those who would like news of computer control, CAD, and related topics, other items of general interest will be included as they come to my attention and as space permits.
The machine I have selected to convert is the ENCO model 100-1527 milling machine. It has a 9 x 42" table, and approximately 24" of travel in the X direction, and 12" in the Y direction. The quill has 5" of travel, and uses standard R8 or "Bridgeport" collets. The spindle drive on this model is the fixed speed type with a choice of 16 different speeds
The variable speed head version of this same machine is the ENCO model 100-1529, and it is identical in every way except for the head. The conversion is exactly the same for both machines. These machines and the many other brands that appear identical to them are known as Bridgeport "clone" machines. This is because they are near copies of the very popular Bridgeport brand milling machine that has been the mainstay of small and large shops worldwide for many decades. The appearance of the "clone" milling machines on the market about 25 years ago coincided with the expiration of several of the key patents held by Bridgeport Machines, Inc., of Bridgeport, Connecticut. Bridgeport, incidentally, is a trademark of that company, which is still in business, and still making milling machines as well as other types of machines.
You thought that was it? Here's more!
Variable Speed DC Motor for the Home Shop
Supplement to the Home Shop Motor Controller
Low-cost Reversing Switch for Electric Motors
A Sliding Bevel Gage with Protractor
More on Three-phase Converters
Any one of these projects is worth the small cost of the book! If you're just learning about machining or you're an old pro this book has the information you need and it belongs in your head. Now's your chance to get ahead - don't miss it!
8-1/2 X 11" Hardcover, 200 pages, profusely illustrated with photographs and working drawings.
Visit my MarketplaceAdvisor Gallery! Power Tools for Power Sellers!
Phone: (***) 744-4449 M-F 9:00 to 4:00 Pacific Standard Time
This item has been seen by alt people!